AlexaでEcho Spot, Echo ShowのBodyTemplateを紐解く
はじめに
Echo ShowとEcho Spotにはテキスト、画像、リンクを表示することが可能です。
それらのコンテンツを表示するためにAlexaにはテンプレートがあります。今回はこれらのテンプレートの中からBodyTemplateを画像つきで解説したいと思います。
なお、画像はAlexaのテスト画面で表示されたEcho ShowとEcho Spotを表示しています。
BodyTemplate1
BodyTemplate1 for Simple Text and Image Views
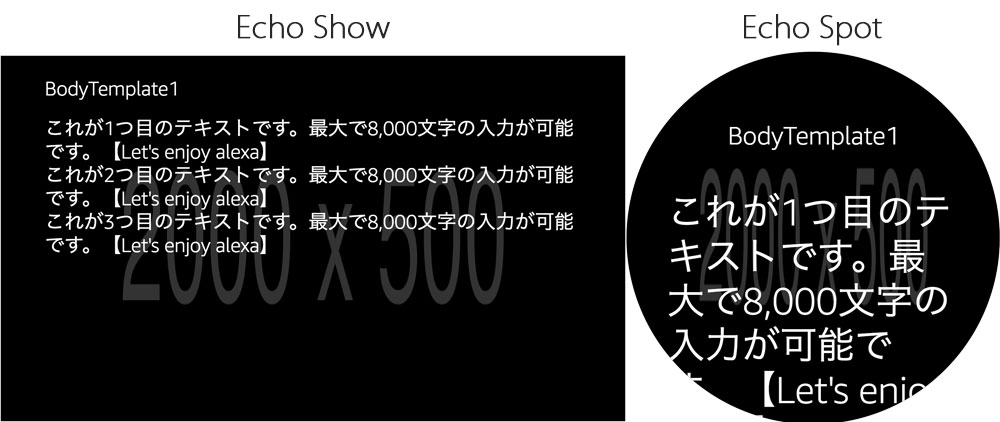
BodyTemplate1は最もシンプルなテンプレートでテキストと背景画像を表示するためのテンプレートです。 指定している要素は下記の通り。
- タイトル
- コンテンツテキスト
- 背景画像
// index.js
...
const title = 'BodyTemplate1';
const backgroundImage = new Alexa.ImageHelper()
.addImageInstance('https://www.aguuu.com/xxx.png')
.getImage();
const textContent = new Alexa.RichTextContentHelper()
.withPrimaryText("これが1つ目のテキストです。最大で8,000文字の入力が可能です。【Let's enjoy alexa】")
.withSecondaryText("これが2つ目のテキストです。最大で8,000文字の入力が可能です。【Let's enjoy alexa】")
.withTertiaryText("これが3つ目のテキストです。最大で8,000文字の入力が可能です。【Let's enjoy alexa】")
.getTextContent();
return handlerInput.responseBuilder
.addRenderTemplateDirective({
type: title,
backButton: 'VISIBLE',
backgroundImage: backgroundImage,
title: title,
textContent: textContent,
token : 'TOKEN',
})
.getResponse();
...
表示は下記の通り。
| 項目 | Echo Show | Echo Spot |
|---|---|---|
| タイトル | 左寄せ | 中央寄せ |
| 本文 | 左上寄せ フォントサイズ 68px スクロール |
左上寄せ フォントサイズ 68px スクロール |
| 背景画像 | 画面サイズに引き伸ばして表示 | 画面サイズに引き伸ばして表示 |
BodyTemplate2
BodyTemplate2 for Image Views and Limited Centered Text
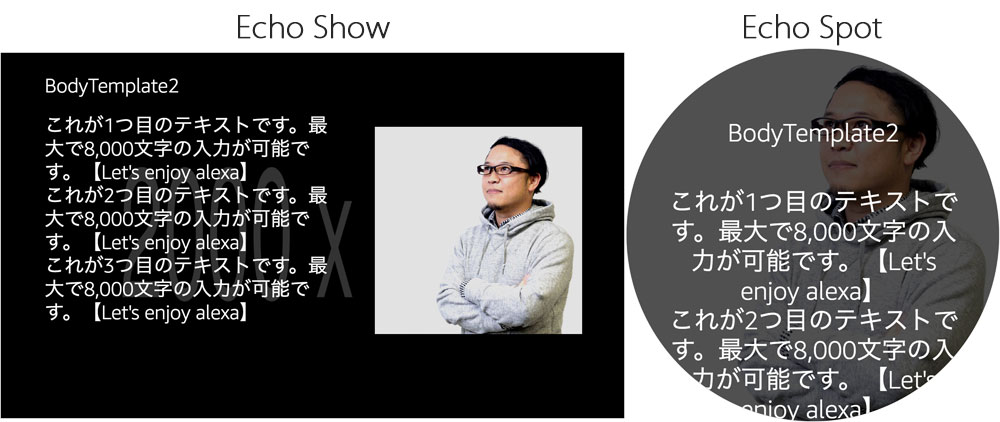
BodyTemplate2はBodyTemplate1に画像を追加したテンプレートです。 指定している要素は下記の通り。
- タイトル
- コンテンツテキスト
- 画像
- 背景画像
// index.js
...
const title = 'BodyTemplate2';
const backgroundImage = new Alexa.ImageHelper()
.addImageInstance('https://www.aguuu.com/xxx.png')
.getImage();
const image = new Alexa.ImageHelper()
.addImageInstance('https://www.aguuu.com/yyy.png')
.getImage();
const textContent = new Alexa.RichTextContentHelper()
.withPrimaryText("これが1つ目のテキストです。最大で8,000文字の入力が可能です。【Let's enjoy alexa】")
.withSecondaryText("これが2つ目のテキストです。最大で8,000文字の入力が可能です。【Let's enjoy alexa】")
.withTertiaryText("これが3つ目のテキストです。最大で8,000文字の入力が可能です。【Let's enjoy alexa】")
.getTextContent();
return handlerInput.responseBuilder
.addRenderTemplateDirective({
type: title,
backButton: 'VISIBLE',
backgroundImage: backgroundImage,
image: image,
title: title,
textContent: textContent,
token : 'TOKEN',
})
.getResponse();
...
表示は下記の通り。
| 項目 | Echo Show | Echo Spot |
|---|---|---|
| タイトル | 左寄せ | 中央寄せ |
| 本文 | 左上寄せ フォントサイズ 32px スクロール |
中央寄せ フォントサイズ 32px スクロール |
| 画像 | 右寄せ | 背景画像として表示 70%透過の黒いスクリムがオーバーレイ |
| 背景画像 | 画面サイズに引き伸ばして表示 | 画面サイズに引き伸ばして表示 画像の後ろに表示されているので基本非表示 |
BodyTemplate3
BodyTemplate3 for Image Views and Limited Left-Aligned Text
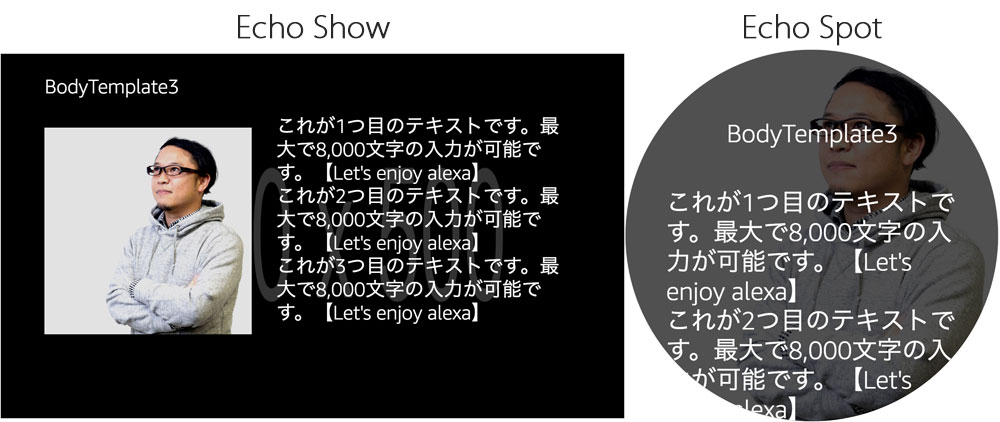
BodyTemplate3はBodyTemplate2と指定する要素は同じテンプレートです。 違いは画像の位置が右=>左に変わります。 指定している要素は下記の通り。
- タイトル
- コンテンツテキスト
- 画像
- 背景画像
// index.js
...
const title = 'BodyTemplate3';
const backgroundImage = new Alexa.ImageHelper()
.addImageInstance('https://www.aguuu.com/xxx.png')
.getImage();
const image = new Alexa.ImageHelper()
.addImageInstance('https://www.aguuu.com/yyy.png')
.getImage();
const textContent = new Alexa.RichTextContentHelper()
.withPrimaryText("これが1つ目のテキストです。最大で8,000文字の入力が可能です。【Let's enjoy alexa】")
.withSecondaryText("これが2つ目のテキストです。最大で8,000文字の入力が可能です。【Let's enjoy alexa】")
.withTertiaryText("これが3つ目のテキストです。最大で8,000文字の入力が可能です。【Let's enjoy alexa】")
.getTextContent();
return handlerInput.responseBuilder
.addRenderTemplateDirective({
type: title,
backButton: 'VISIBLE',
backgroundImage: backgroundImage,
image: image,
title: title,
textContent: textContent,
token : 'TOKEN',
})
.getResponse();
...
表示は下記の通り。
| 項目 | Echo Show | Echo Spot |
|---|---|---|
| タイトル | 左寄せ | 中央寄せ |
| 本文 | 左上寄せ フォントサイズ 32px スクロール |
中央寄せ フォントサイズ 32px スクロール |
| 画像 | 左寄せ | 背景画像として表示 70%透過の黒いスクリムがオーバーレイ |
| 背景画像 | 画面サイズに引き伸ばして表示 | 画面サイズに引き伸ばして表示 画像の後ろに表示されているので基本非表示 |
BodyTemplate6
BodyTemplate6 for Text and Optional Background Image
BodyTemplate6はテキストと背景画像が指定できるテンプレートです。 指定している要素は下記の通り。
- コンテンツテキスト
- 背景画像
// index.js
...
const title = 'BodyTemplate6';
const backgroundImage = new Alexa.ImageHelper()
.addImageInstance('https://www.aguuu.com/xxx.png')
.getImage();
const textContent = new Alexa.RichTextContentHelper()
.withPrimaryText("Alexa.west")
.withSecondaryText("Let's enjoy alexa")
.getTextContent();
return handlerInput.responseBuilder
.addRenderTemplateDirective({
type: title,
backButton: 'VISIBLE',
backgroundImage: backgroundImage,
textContent: textContent,
token : 'TOKEN',
})
.getResponse();
...
表示は下記の通り。
| 項目 | Echo Show | Echo Spot |
|---|---|---|
| 本文 | 左下寄せ フォントサイズ 68px 最大2〜3行 |
中央上寄せ フォントサイズ 68px スクロール |
| 背景画像 | 画面サイズに引き伸ばして表示 | 画面サイズに引き伸ばして表示 |
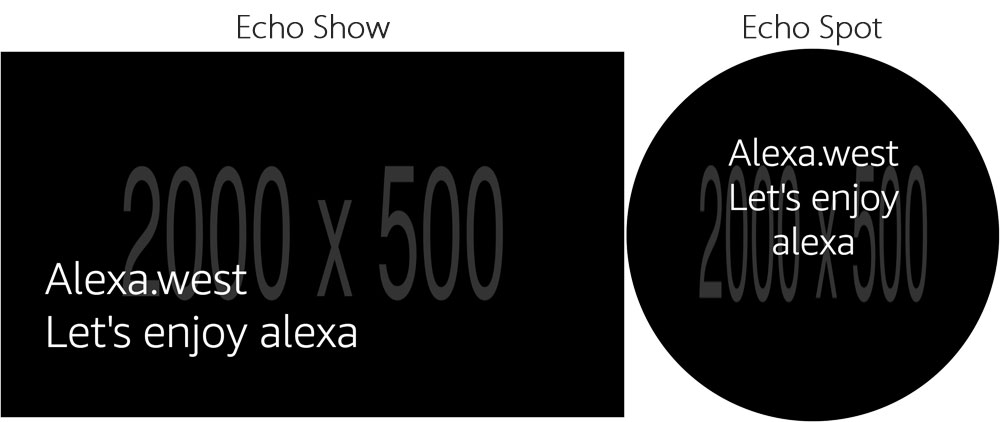
On Echo Spot, background images are scaled down based on the aspect ratio, and then centered within the available viewport. For example, a 1024x600px background image on Echo Show will be scaled to 819x480px on Echo Spot.
公式ドキュメントではアスペクト比は保持されると書いてある。しかし、テストシュミレーターではアスペクト比が変わっているように見える。これは実機で確認したみたい。
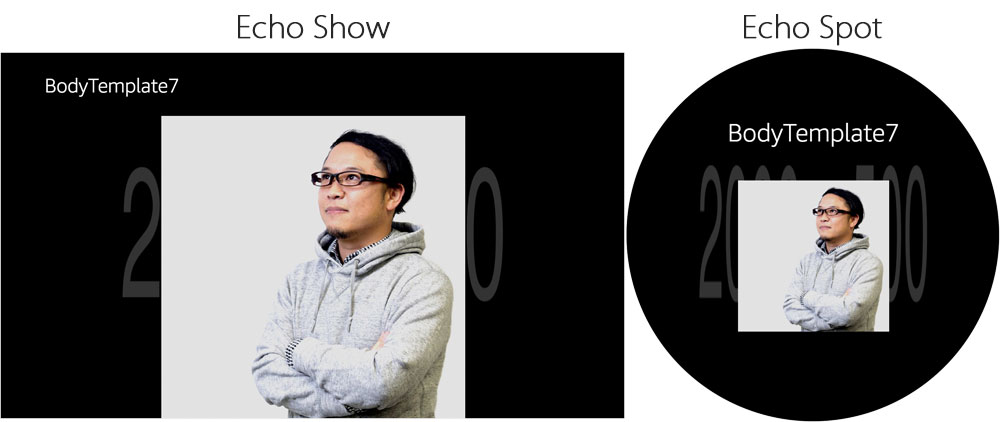
BodyTemplate7
BodyTemplate7 for Scalable Foreground Image With Optional Background Image
BodyTemplate7はタイトルと画像が指定可能なテンプレートです。 指定している要素は下記の通り。
- タイトル
- 画像
- 背景画像
// index.js
...
const title = 'BodyTemplate7';
const backgroundImage = new Alexa.ImageHelper()
.addImageInstance('https://www.aguuu.com/xxx.png')
.getImage();
const image = new Alexa.ImageHelper()
.addImageInstance('https://www.aguuu.com/yyy.png')
.getImage();
return handlerInput.responseBuilder
.addRenderTemplateDirective({
type: title,
title: title,
backButton: 'VISIBLE',
backgroundImage: backgroundImage,
image: image,
token : 'TOKEN',
})
.getResponse();
...
表示は下記の通り。
| 項目 | Echo Show | Echo Spot |
|---|---|---|
| タイトル | 左上寄せ | 中央上寄せ |
| 画像 | 中央寄せ | 中央寄せ |
| 背景画像 | 画面サイズに引き伸ばして表示 | 画面サイズに引き伸ばして表示 |
まとめ
Echo ShowとEcho Spotで表示の仕方が異なるので実装の際には、実機で確認した方が良さそうという感じです。
Let’s enjoy alexa.